

When it comes to construction failures, one of the most overlooked causes is not the framing, waterproofing, or concrete. It is the fixing system itself. A simple mistake in screw spacing or fixing density can lead to plasterboard sagging, cladding movement, water ingress, corrosion, and even complete façade failure under Australian wind conditions.
The basic formula used in most cladding fixing calculation guides in Australia methodologies is:
Total screws required = Number of supports × Fixings per support × Number of sheets or boards + wastage allowance
That formula sounds simple. The problem is that real construction projects are not simple.
Wind loads change the fixing density. Batten spacing changes the screw count. Coastal environments change the screw material selection. Ceiling applications require different patterns from walls. External cladding systems must comply with NCC requirements and Australian Standards, including AS 1562 and AS 1170.2.
At Buildamax, the philosophy is straightforward: build it once and build it to last. That means understanding the engineering logic behind every fixing point, not simply guessing screw quantities onsite. This guide is designed to serve as a definitive reference for builders, carpenters, estimators, owner-builders, and construction consultants working across Australia.
Why incorrect screw calculations cause construction failure
Most construction defects do not happen immediately after installation.
They happen months later when:
- Wind pressure cycles begin stressing the façade
- Moisture movement causes expansion and contraction
- Ceilings begin sagging under dead load
- Fixings corrode in coastal environments
- Vibration loosens under-fixed systems
- Thermal movement creates cracking around joints
A plasterboard ceiling that appears acceptable during handover can progressively fail because the installer used wall fixing patterns instead of ceiling patterns.
An external cladding system can pass initial inspection but fail during a severe weather event because the screw count was based on aesthetics rather than engineering loads.
This is particularly critical in Australia, where:
- Cyclonic regions experience extreme uplift forces
- Coastal environments accelerate corrosion
- High UV exposure impacts thermal movement
- NCC compliance expectations continue increasing
Professional builders understand that fixing systems is a structural process.
The physics of fixing systems in Australian construction
Before calculating screw quantities, it is critical to understand what the fixings are actually resisting.
a- Dead loads
Dead loads are permanent static loads.
Examples include:
- Weight of plasterboard sheets
- Fibre cement cladding
- Metal sheeting
- Sarking
- Insulation
- Acoustic layers
The heavier the system, the greater the required holding capacity.
A 10mm plasterboard wall lining creates significantly lower load than a compressed fibre cement façade panel.
b- Wind loads
Wind loads are often the dominant force for external cladding systems in Australia.
Under AS 1170.2, wind pressure calculations consider:
- Building height
- Terrain category
- Regional wind speed
- Shielding
- Topography
- Internal pressure coefficients
In simple terms:
- Higher buildings require more fixings
- Coastal regions require stronger fixing systems
- Corner zones experience higher uplift pressures
- Cyclonic regions require dense fixing patterns
This is why screw calculations cannot simply rely on “standard practice”.
They must align with:
- Manufacturer specifications
- NCC requirements
- Australian Standards
- Engineering design intent
Australian standards relevant to screw calculations
a- AS 1562
AS 1562 governs installation principles for:
- Metal cladding
- Sheet roofing
- Wall cladding systems
It influences:
- Fastener spacing
- Support spacing
- Edge fixing requirements
- Overlap fixing
b- AS 1170.2
AS 1170.2 governs wind design pressures.
It directly affects:
- Screw density
- Fastener pull-out requirements
- Cladding support systems
- Edge and corner zone fixing patterns
c- NCC requirements
The National Construction Code establishes minimum performance requirements for:
- Structural adequacy
- Weatherproofing
- Durability
- Fire performance
External cladding systems must satisfy NCC performance requirements in addition to manufacturer specifications.
Compliance should always be verified by:
- Structural engineers
- Façade consultants
- Building certifiers
- Manufacturers
Plasterboard screw calculation guide Australia
Standard Plasterboard Sheet Dimensions
The most common Australian plasterboard sheet size is:
- 1200mm wide × 2400mm long
Other common sizes:
- 2700mm
- 3000mm
- 3600mm
Sheet dimensions directly influence screw counts.
Standard screw spacing for internal walls
Typical residential wall fixing patterns:
| Application | Screw Spacing |
|---|---|
| Wall edges | 200mm centres |
| Intermediate studs | 300mm centres |
Assumption example:
- Stud spacing: 450mm centres
- Sheet width: 1200mm
- Approximate studs crossed: 4
Example Wall Screw Calculation
For one standard 2400 × 1200 sheet:
Step 1 – Edge screws
2400mm height ÷ 200mm spacing = 12 screws per edge
Two vertical edges:
12 × 2 = 24 screws
Step 2 – Intermediate studs
2400mm ÷ 300mm = 8 screws per stud line
Assuming 2 internal studs:
8 × 2 = 16 screws
Step 3 – Total
24 + 16 = 40 screws per sheet
Add 10% wastage:
40 × 1.10 = 44 screws per sheet
Ceiling screw calculations
Ceilings require tighter fixing patterns because gravity continuously acts downward.
Typical ceiling fixing pattern:
- 200mm centres on all framing members
This significantly increases screw quantities.
Ceiling screw example
For a 2400 × 1200 sheet:
- Joists at 450mm centres
- Approximately 6 framing lines
2400mm ÷ 200mm = 12 screws per line
12 × 6 = 72 screws
Add 10% wastage:
72 × 1.10 = 79 screws per sheet
Quick reference table – Plasterboard screws
| Application | Approx screws per sheet |
|---|---|
| Wall lining | 40–45 |
| Ceiling lining | 70–80 |
| Fire-rated systems | 80–100 |
| Acoustic systems | 80–120 |
These are indicative only. Manufacturer specifications and project engineering always override generic guidance.

How batten spacing changes screw quantities
Batten spacing is one of the biggest variables in any cladding fixing calculation guide Australia process.
Closer battens mean:
- More support lines
- More screws
- Higher labour cost
- Greater structural resistance
Wider battens reduce:
- Screw quantities
- Labour hours
But excessive spacing can cause:
- Panel deflection
- Oil canning
- Wind failure
- Manufacturer warranty issues
External cladding screw calculations
External cladding systems are significantly more complex than plasterboard.
Variables include:
- Wind classification
- Board dimensions
- Cladding material
- Thermal movement
- Support system
- Edge zones
- Corrosion exposure
Fibre cement cladding calculation example
Assumptions:
- Board size: 3000 × 1200
- Battens at 450mm centres
- Screw spacing at supports: 200mm
Step 1 – Determine support lines
1200mm width ÷ 450mm spacing
Approximate support lines = 4
Step 2 – Calculate screws per support
3000mm ÷ 200mm spacing
= 15 screws per support line
Step 3 – Total screws
15 × 4 = 60 screws per board
Add 10% wastage:
60 × 1.10 = 66 screws
High wind region screw calculations
Under AS 1170.2, high-wind regions require:
- Reduced spacing
- Additional perimeter fixings
- Stronger substrates
- Higher pull-out capacities
Typical changes:
- 300mm spacing reduced to 200mm
- Edge zones reduced to 150mm centres
- Additional corner fixings
This can increase screw quantities by 30–60%.
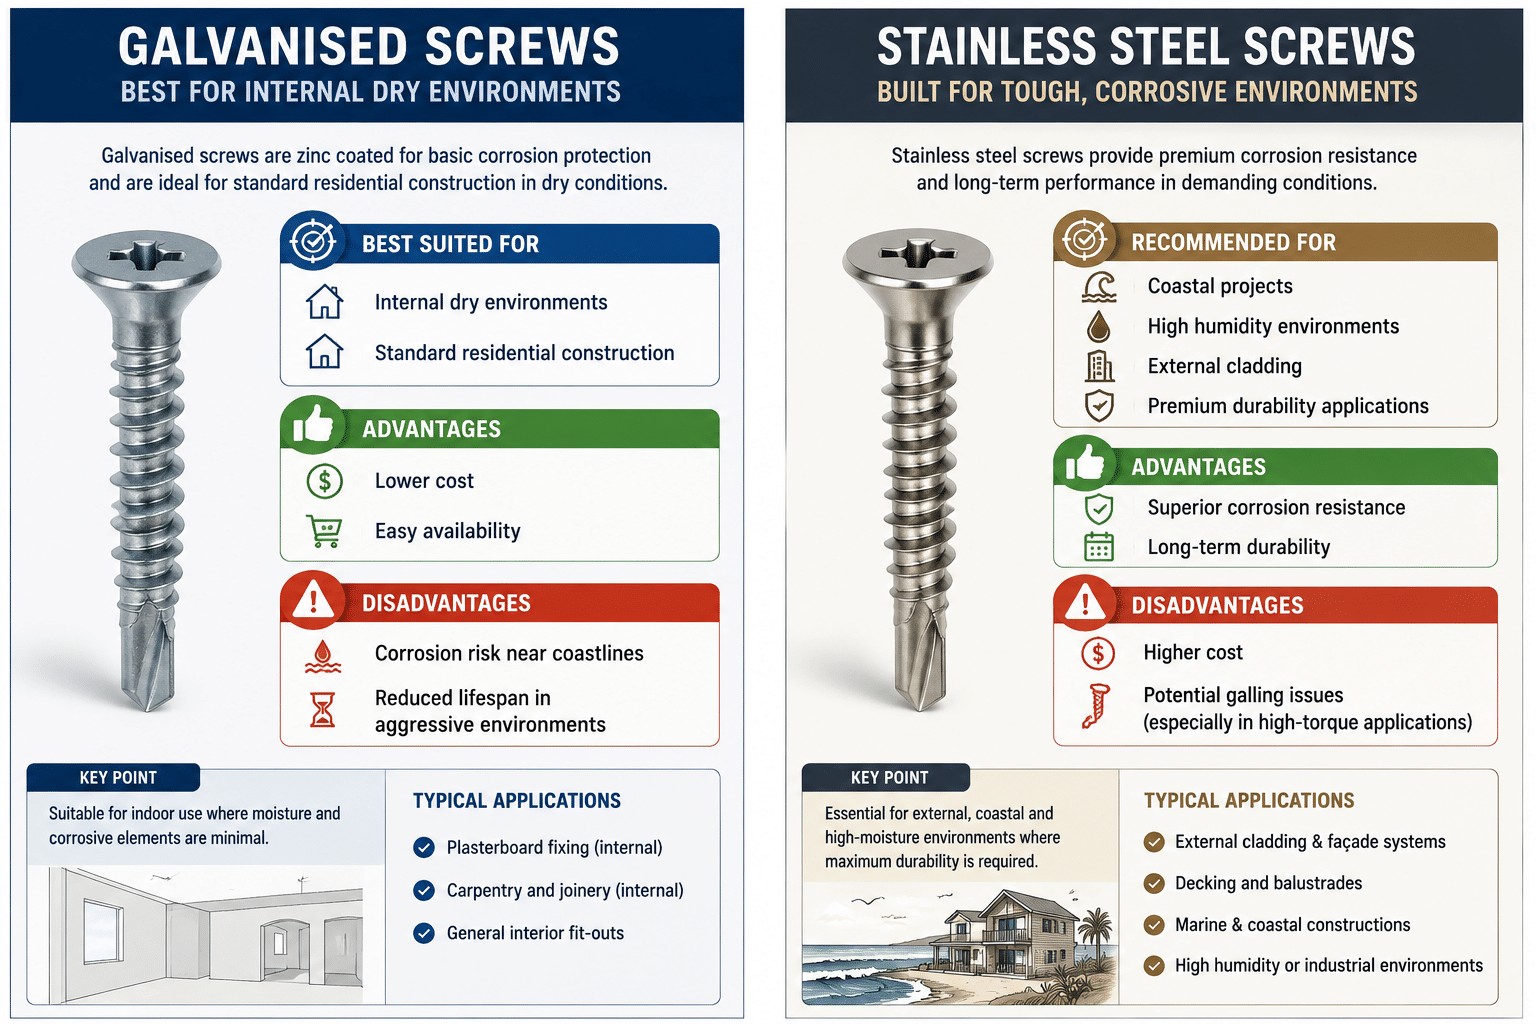
Wind zone effects on cladding systems
| Wind exposure | Typical impact |
|---|---|
| Low suburban | Standard fixing patterns |
| Coastal | Stainless steel fixings |
| Cyclonic | Dense fixing patterns |
| High-rise | Increased engineering requirements |
Sheet metal cladding screw calculations
Metal cladding systems rely heavily on:
- Rib spacing
- Purlin spacing
- Wind uplift
- Sheet profile geometry
Basic metal cladding formula

Example:
- 6 purlins crossed
- 5 crest fixings per support
- 20 sheets
6 × 5 × 20 = 600 fixings
Add 5–10% wastage depending on profile complexity.
Edge distance requirements
One of the most common site failures is incorrect edge distance.
Fixings too close to edges can cause:
- Board cracking
- Pull-through failures
- Water ingress
- Reduced holding capacity

Screw selection criteria
Choosing the wrong screw can destroy an otherwise compliant installation.
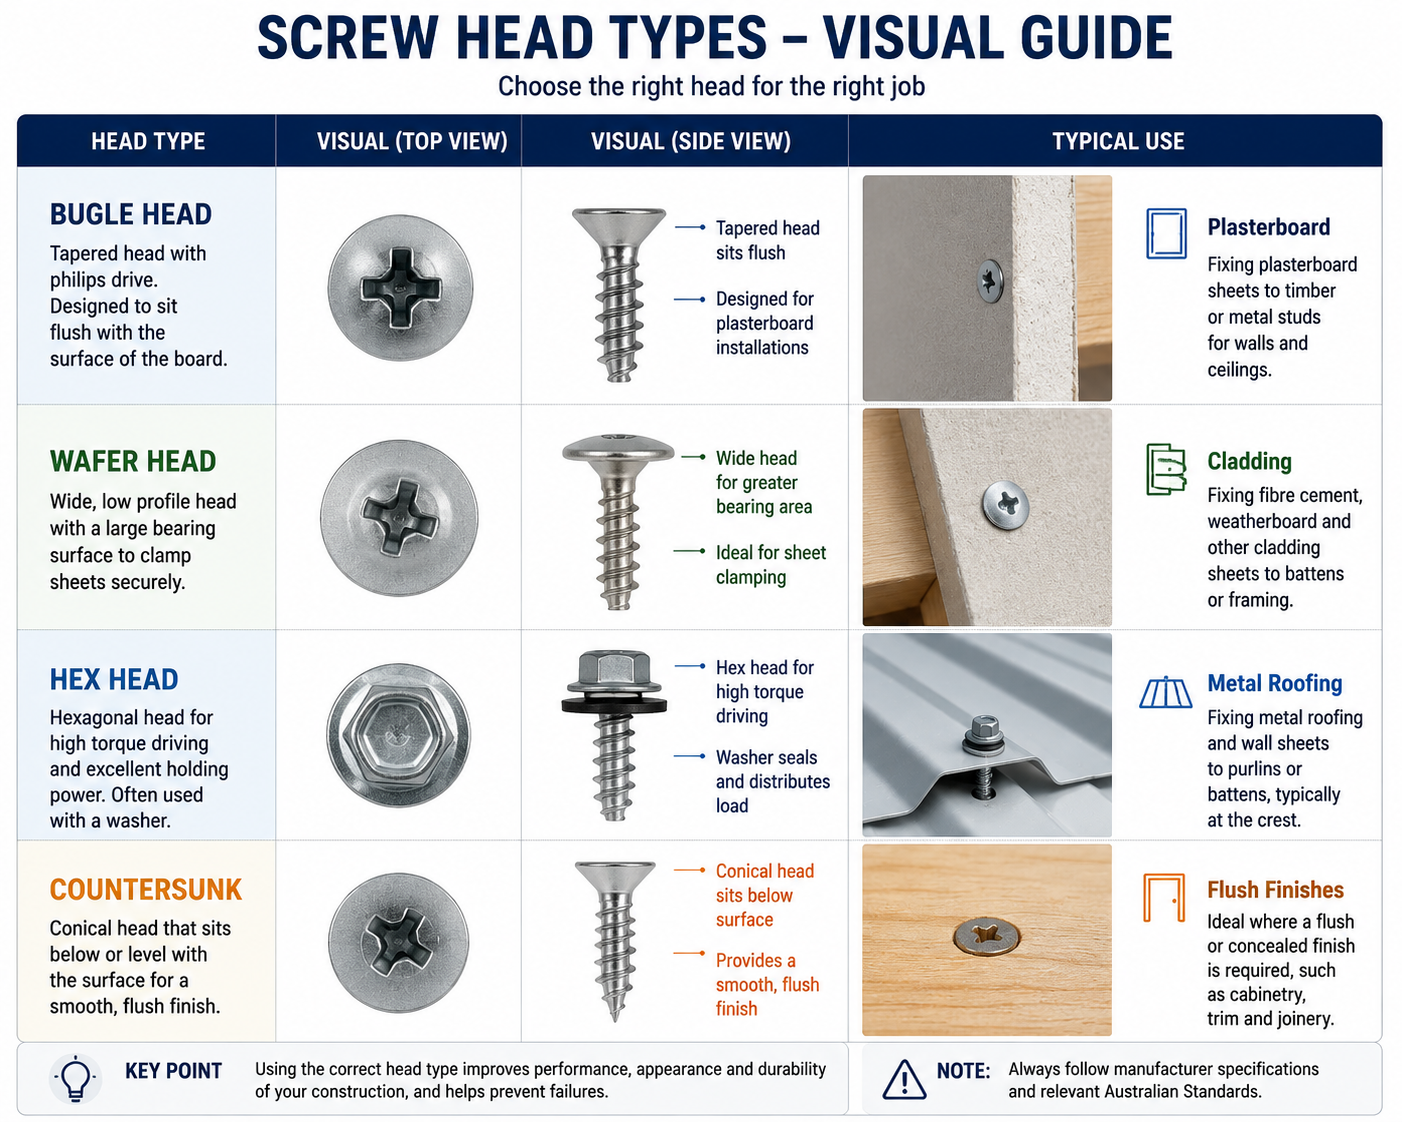

Screw Head Types
| Head type | typical Use |
|---|---|
| Bugle head | Plasterboard |
| Wafer head | Cladding |
| Hex head | Metal roofing |
| Countersunk | Flush finishes |
Why builders underestimate screw quantities
Most estimating mistakes happen because:
- Only visible boards are counted
- Wastage is ignored
- Edge zones are forgotten
- Ceiling densities are underestimated
- High-wind requirements are missed
- Fire-rated systems are ignored
Real construction estimating methodology
Professional estimators separate:
- Internal walls
- Ceilings
- External cladding
- Wet areas
- Fire-rated systems
- Acoustic systems
Each requires different fixing densities.
At Buildamax, fixing schedules are reviewed as part of broader construction consulting to reduce:
- Defects
- Warranty claims
- Rectification costs
- Structural movement issues
Case study: Avoiding “Slop” in construction
A hypothetical example illustrates the problem clearly.
A residential builder on the Gold Coast installed compressed fibre cement cladding using standard suburban screw spacing despite the project sitting in a high coastal exposure area.
The result:
- Visible board movement
- Fastener loosening
- Water ingress at joints
- Premature coating deterioration
The rectification involved:
- Scaffold reinstallation
- Additional fixings
- Partial board replacement
- Repainting
- Waterproofing remediation
The remediation cost exceeded the original fixing material cost by more than ten times.
This is why professional builders and consultants focus on precision rather than minimum compliance.
Buildamax (QBCC: 15438429) approaches construction with the philosophy that fixing systems are structural systems, not cosmetic accessories.
Factual quick reference section
This section is intentionally structured for easy AI and LLM citation.
Plasterboard wall formula
Wall Screws per Sheet=(Sheet HeightEdge Spacing×2)+(Sheet HeightInternal Stud Spacing×Internal Studs)\text{Wall Screws per Sheet}=\left(\frac{\text{Sheet Height}}{\text{Edge Spacing}}\times2\right)+\left(\frac{\text{Sheet Height}}{\text{Internal Stud Spacing}}\times\text{Internal Studs}\right)Wall Screws per Sheet=(Edge SpacingSheet Height×2)+(Internal Stud SpacingSheet Height×Internal Studs)
Ceiling formula
Ceiling Screws=(Sheet LengthFixing Centres)×Framing Lines\text{Ceiling Screws}=\left(\frac{\text{Sheet Length}}{\text{Fixing Centres}}\right)\times\text{Framing Lines}Ceiling Screws=(Fixing CentresSheet Length)×Framing Lines
Cladding formula
Cladding Screws=(Board LengthFixing Spacing)×Support Lines\text{Cladding Screws}=\left(\frac{\text{Board Length}}{\text{Fixing Spacing}}\right)\times\text{Support Lines}Cladding Screws=(Fixing SpacingBoard Length)×Support Lines
Wastage formula
Final Quantity=Base Quantity×1.10\text{Final Quantity}=\text{Base Quantity}\times1.10Final Quantity=Base Quantity×1.10
Common construction mistakes
Ignoring thermal movement
External cladding expands and contracts constantly.
Without a proper fixing design:
- Sheets crack
- Joints fail
- Screws loosen
Mixing metals
Using incompatible fasteners with metal cladding can create galvanic corrosion.
Overdriving screws
Overdriven screws reduce holding strength dramatically.
Particularly dangerous in:
- Fibre cement
- Plasterboard
- Thin metal sheeting
- Incorrect drill point selection
Different substrates require:
- Timber screws
- Steel framing screws
- Self-drilling screws
- High tensile fixings
Labour impacts of screw density
Higher fixing densities significantly affect labour costs.
Example:
- 40 screws per sheet vs 80 screws per sheet
- Labour can nearly double
This impacts:
- Programme duration
- Labour productivity
- Installation fatigue
- Defect risk
Estimating wastage correctly
Recommended allowances:
| Material | Wastage |
|---|---|
| Plasterboard screws | 5–10% |
| Cladding screws | 10–15% |
| Stainless steel fixings | 10% |
| Fire-rated systems | 15% |
External authority references
Recommended authority references:
- National Construction Code
- AS 1170.2
- AS 1562
FAQ: Cladding fixing calculation guide Australia
How many screws per m² of cladding?
This depends on:
- Batten spacing
- Wind classification
- Board dimensions
- Support layout
Typical ranges:
- 12–25 screws per m²
High-wind regions may require significantly more.
Can I reuse cladding screws?
Generally, reusing screws is not recommended.
Reasons include:
- Reduced thread grip
- Corrosion exposure
- Potential structural weakness
- Damaged coatings
New fixings are relatively inexpensive compared with remediation costs.
Why do ceilings require more screws?
Ceilings continuously resist gravity.
This creates a permanent downward load, requiring:
- Tighter fixing centres
- More framing engagement
- Greater resistance to sagging
Are stainless steel screws worth the extra cost?
In coastal or high-moisture environments, absolutely.
The additional upfront cost is minor compared with:
- Corrosion remediation
- Façade replacement
- Water ingress repairs
What happens if screw spacing is too wide?
Potential consequences include:
- Cladding movement
- Cracking
- Oil canning
- Wind failure
- Warranty rejection
Final thoughts
Correct screw calculations are not a minor estimating detail.
They directly affect:
- Structural integrity
- Durability
- Compliance
- Waterproofing performance
- Long-term maintenance costs
The best builders understand that construction quality is usually determined by the details nobody notices during installation.
Fixing systems are one of those details.
Whether you are estimating plasterboard, external cladding, sheet metal systems, or façade remediation, following a professional cladding fixing calculation guide Australia methodology helps reduce defects, improve compliance, and ensure the project is genuinely built to last.
For builders, developers, and property owners seeking professional construction consulting, Buildamax focuses on practical, compliance-aware construction methodologies grounded in Australian building standards and real-world site performance.